The Fourth Engineer’s Guide to Conquering High-Pressure Valve Replacement—Step by Step!

How to Remove and Replace a High-Pressure Valve on a Main Air Compressor: A Step-by-Step Guide for Fourth Engineers
Ah, the glamorous life of a fourth engineer. Nothing screams adventure quite like wrestling with carbon deposits and gaskets while questioning your career choices. Today, we’re tackling one of those “must-know” tasks: removing and replacing the high-pressure suction valve on a Sperry Main Air Compressor. Strap in, because this is as thrilling as it gets—if your idea of fun involves grease, hammers, and strict torque values. Let’s dive in! 🛠️
Safety First (Because We’d Prefer You Keep All Your Fingers)
Before you go full-on mechanic mode, let’s talk safety:
- Power Down: Isolate the power because sparks + compressed air = headlines you don’t want to make.
- Tag It: Slap on a “Do Not Start” tag. It’s like leaving a sticky note saying, “Don’t touch this unless you want a bad day.”
- Close the Valves: Shut the outlet valve tighter than your wallet on payday.
- Manual Mode: Put the compressor in manual mode so it doesn’t surprise you with an impromptu “on” moment.
🛡️ Pro Tip: Overconfidence leads to oversight—double-check every safety measure.
Step 1: Loosen That Nut (No, Not Your Colleague)
- Start by removing the locking nut of the high-pressure suction valve.
- Pro Tip: Use the right-sized tool. Using the wrong size is a surefire way to strip the nut and your patience.
Once the nut is off, give the flange a gentle tap with a hammer. This isn’t a WWE match—just a light tap will do. Lift the flange with your hand like a pro. Voilà, the high-pressure valve cover is off! 🎉
Step 2: Inspect the Damage (Or Marvel at the Grime)
Now, stare in awe at the masterpiece of carbon deposits inside the valve. Your job? Get rid of it.
- Tools of the Trade: A buffing machine, pencil grinder, or a good ol’ sheet of emery paper will do the trick.
- Method: Scrub until it shines brighter than your career aspirations. 🧼✨
Check the valve seat for damage and ensure the gasket isn’t clinging on for dear life. If it’s broken, congrats—you’re replacing it. Use a sharpened welding rod to remove the gasket if needed.
Step 3: Out with the Old, In with the New
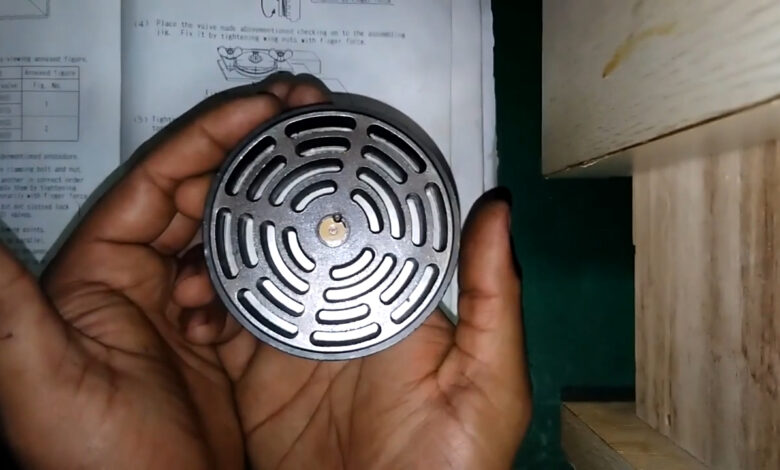
Time to swap the old, carbon-coated valve with a shiny new one. But wait!
- Match the Numbers: Double-check that the part number on your new valve matches the manual. Mixing suction and discharge valves is a rookie move that will earn you all the wrong kinds of attention.
- Mind the Gasket: Apply some molybdenum paste (aka fancy glue for engineers) to keep the gasket in place. Trust us, you don’t want it slipping around mid-installation.
Step 4: Reassemble Like a Boss
- Place the new valve in its seat, ensuring the gasket is properly aligned.
- Fix the cover back in place.
- Tighten the nut diagonally (yes, diagonally) to ensure even pressure. Torque values matter here—don’t just wing it unless you enjoy repeat repairs.
Step 5: Check, Double-Check, and Pretend You’re Done
Once everything is snug and secure, do a quick check:
- Is the gasket seated properly?
- Is the cover flush?
- Did you tighten everything according to the manual?
If yes, congrats! You’re almost qualified to troubleshoot a toaster. 🎉
Common Mistakes to Avoid
- Forgetting the Gasket: Unless you like redoing the job, always replace damaged gaskets.
- Mixing Valves: Suction and discharge valves are not interchangeable. Just don’t.
- Ignoring the Manual: Torque values exist for a reason. Guesswork is a recipe for leaks and judgmental stares.
🛑 Pro Tip: Treat the manual like gospel—it’s written in blood, sweat, and experience.
Final Thoughts
If you made it this far without throwing a wrench or questioning your life choices, congratulations! 🎊 Maintenance on a Sperry compressor isn’t rocket science, but it does demand attention to detail and a willingness to get your hands dirty.
Follow the manual, don’t skip the safety steps, and remember: every mistake is just a lesson in disguise (or an excuse to buy better tools).
Got questions or a horror story to share? Drop it in the comments below—because misery loves company. Until next time, keep those valves clean and your spirits higher than the pressure gauge. 😉
Key Takeaways
- Safety First: Isolate power and lockout-tagout.
- Right Tools, Right Steps: Don’t skip the manual—precision matters.
- Gasket Care: Replace it religiously; it’s the unsung hero of a leak-free system.
- Torque Values Rule: Tighten evenly and accurately to prevent future headaches.


